Simcoe Skies Astronomy
Miscellaneous Tips (most were learned the hard way)
(Note: there are one-page printable LXD-55 Setup & Alignment tips here and
Webcam Drift Alignment tips here).
Imaging Tips
General:
- Plug your camera in, turn it on with your imaging program in preview mode, and let it "warm up" for 10 minutes prior to imaging. This
way your hot pixels at the end of your imaging will match those at the beginning, and you can remove them properly with a dark frame.
Dark Frames:
- Capture your dark frames with the camera IN the eyepiece adapter. NEVER remove it when creating dark frames, as you change the temperature
by changing the surroundings, and thus introduce a hot pixel mismatch (been there, done that).
- Dark frames are like accessories. The more you have, the better. You should have at least 10 frames, stacked to create a single dark,
preferably 20-30.
- Capture your dark frames at the END of your data for EACH TARGET IMAGE. Example: if you want 80 frames of "data", then leave your imaging software
RUNNING after the 80, cap the scope with the end cap, and let it continue to take 20-30 more images. This way you KNOW where you put it, and you KNOW you used
the exact same camera settings, temperature, etc. When it comes processing time, just use the last 30 frames "full frame" to create your dark, then
proceed with processing your data frames.
Focusing the Faint Fuzzies:
- Don't try to focus on the fuzzies for imaging. You can't. Focus on a bright star instead, and the fuzzies will also be in focus. Same applies
to lunar/planetary imaging.
- The BEST way to do this, hands down, is by using a Bahtinov Mask. To see one of these and how it works, click
here. To make your own, based on the parameters of your particular telescope,
click here. You can make one out of plastic, cardboard,
or any other suitable lightweight (preferably dew-resistant) material.
- As the second-best method (not even close thought), I offer the following easy solution:
- Find a bright star, CENTER it in a 12mm (or so) eyepiece, and then replace the eyepiece with your camera.
- Ensure your cam is set to the lowest frame rate, longest exposure, and medium-high gain so there's lots of light from the star.
- Chances are, you have the sucker on the screen, but it's out of focus. Rack the focus INWARD until you see the donut of light starting
to converge to a point.
- Now, hang a 1/4" dowel vertically across your aperture (I just put a clothespin on the dowel and let it hang there).
- Approaching focus, you'll see diffraction spikes appear (you should see two of them, one on either side of the star - their orientation
will depend on the rotation of your camera and scope).
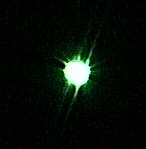 |
 |
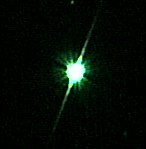 |
| approaching focus |
closer to focus |
AT focus |
- Focus slowly until these diffraction spikes merge into one SHARP spike that goes through the star. Now you're in focus.
- LOCK the focuser at this point, so it doesn't move. Parfocalize your eyepiece(s) with parfocal ring to make life easier, or just insert
them part way.
- Don't forget to remove and store the dowel. You'll need to reuse it after each collimation.
- I perform this ritual every time I go out imaging, and just do it as a routine on the 3rd star of my "3-star align".
Setup Tips
LXD-55 Tripod Positioning (98% guaranteed to have spousal approval)
- To reduce setup time and get a better polar alignment (particularly for imaging), make TRIPOD POSTS to go into the ground at your favorite setup
locations. Get three 12" lengths of 5/8" threaded rod, sharpen one end to a point, and weld or braze 3 pairs of 5/8" nuts together. Screw the nuts
onto the non-sharpened end of each rod (the first nut is to screw onto the rod, the 2nd should stand empty above it).
Now set up your tripod in a level spot, with the legs fully collapsed. MARK the 3 leg positions. Drive these threaded rods through a large washer
and into the ground for each leg. The tripod "feet" should fit nicely into the nuts, providing a stable base. And you're guaranteed to set it
up in the SAME place the next time (look, no awful looking concrete pad!!). They fit under the lawn mower, but mind you, they're a pig to stub a
toe on (might be best to plop something decorative on them to keep the wife and kids happy - pink flamingos anyone?)
Reproducing Polar Alignment
- A big problem with a tripod mount or a non-fixed OTA is that it takes considerable time to do a good polar alignment. If you have a pier or
have tripod positioning posts as noted above, then you can PRESERVE your hard work drift alignment for next time (or work toward improving it
over several sessions). Just use metal reinforced epoxy to glue a $2 laser pointer to the mount, in a position that hits a target when turned on
(preferably a stationary, nearby one - I use my brick wall). Use some additional metal reinforced epoxy putty to glue a small NUT to the laser
pointer, directly over the pushbutton, so that you can screw in a small bolt to turn it on and unscrew it to turn it off (thanks, Mike Gray) - see Mike's
writeup & images showing how to do this here.
Now you can use a permanent marker and MARK your laser dot target position for alignment, and quickly use the manual alt/az adjustment knobs
to reproduce it next time out. Oh, one more thing... don't use a neighbour's wall since you can't mark it up with a permanent marker (no duh!).
Home